Kubernetes
Learning Guide
DevOps
Getting Started with Kubernetes: A Developer Guide

Kubernetes, often abbreviated as K8s, is an open-source container orchestration platform that automates the deployment, scaling, and management of containerized applications. Originally developed by Google, Kubernetes has become the de facto standard for container orchestration, enabling developers and operators to manage complex applications with ease.
In this blog, we will cover the fundamental concepts of Kubernetes, how to set it up, and how to deploy your first application. By the end of this guide, you should have a solid understanding of Kubernetes and be ready to start using it in your projects.
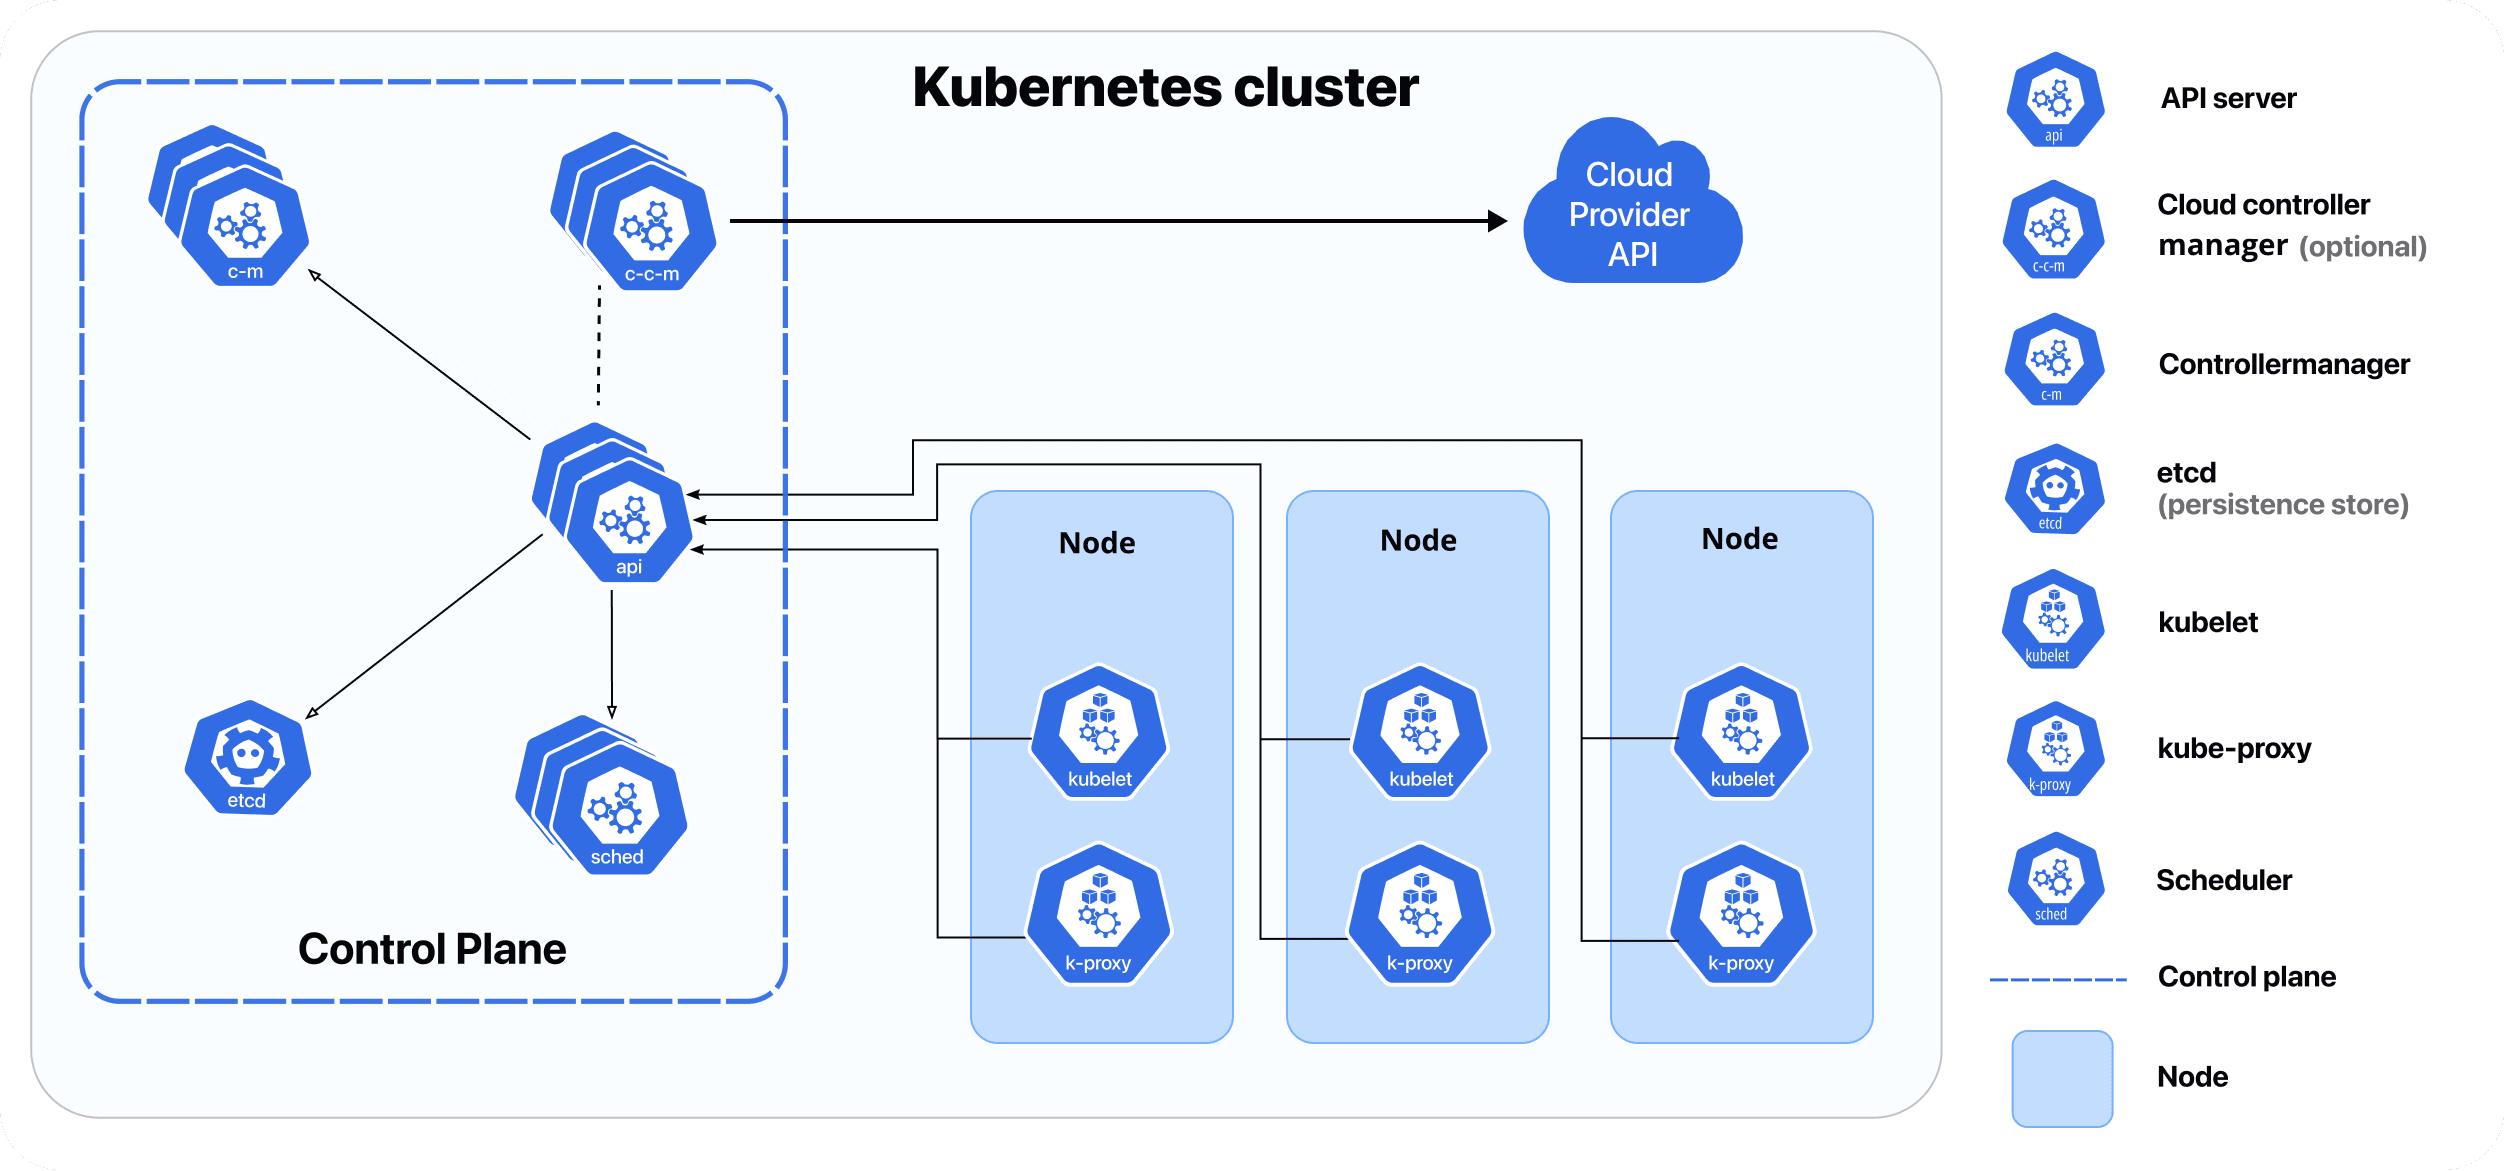
1. Understanding Kubernetes Architecture
Before diving into the setup, it's essential to understand the core components of Kubernetes:
-
Node: A worker machine in Kubernetes, which can be a physical or virtual machine. Each node runs at least one container runtime (like Docker) and the necessary services to manage the containers.
-
Pod: The smallest deployable unit in Kubernetes, a Pod can contain one or more containers that share the same network namespace and storage.
-
Deployment: A higher-level abstraction that manages a set of identical Pods, ensuring that the desired number of Pods are running at all times.
-
Service: An abstraction that defines a logical set of Pods and a policy to access them, usually through a stable IP address or DNS name.
-
Kubernetes Master: The control plane that manages the Kubernetes cluster. It consists of several components, including the API server, etcd (a distributed key-value store), controller manager, and scheduler.
Kubernetes Architecture Diagram
2. Setting Up Your Kubernetes Environment
Prerequisites
Before you start, ensure you have the following:
- A machine with at least 2 GB of RAM and 2 CPUs.
- Docker installed on your machine.
kubectl, the command-line tool for interacting with Kubernetes.
Installing Minikube
For local development, Minikube is a great tool that allows you to run Kubernetes on your local machine. Follow these steps to install Minikube:
-
Install Minikube:
- For macOS:
brew install minikube-
For Windows: Download the installer from the Minikube releases page.
-
For Linux:
curl -LO https://storage.googleapis.com/minikube/releases/latest/minikube-linux-amd64 sudo install minikube-linux-amd64 /usr/local/bin/minikube -
Start Minikube:
minikube start -
Verify Installation:
kubectl get nodesYou should see a single node in the
Readystate.
Installing kubectl
If you haven't installed kubectl, you can do so using the following commands:
For macOS:
brew install kubectl
For Windows: Download the installer from the Kubernetes releases page.
For Linux:
curl -LO "https://storage.googleapis.com/kubernetes-release/release/$(curl -s https://storage.googleapis.com/kubernetes-release/release/stable.txt)/bin/linux/amd64/kubectl"
chmod +x ./kubectl
sudo mv ./kubectl /usr/local/bin/kubectl
3. Creating Your First Kubernetes Deployment
Now that you have your Kubernetes environment set up, let's deploy a simple application. We will use a basic Nginx web server for this example.
Step 1: Create a Deployment
Create a file named nginx-deployment.yaml with the following content:
apiVersion: apps/v1
kind: Deployment
metadata:
  name: nginx-deployment
spec:
  replicas: 3
  selector:
    matchLabels:
      app: nginx
  template:
    metadata:
      labels:
        app: nginx
    spec:
      containers:
      - name: nginx
        image: nginx:latest
        ports:
        - containerPort: 80
Step 2: Apply the Deployment
Run the following command to create the deployment:
kubectl apply -f nginx-deployment.yaml
Step 3: Verify the Deployment
Check the status of your deployment:
kubectl get deployments
You should see the nginx-deployment listed with the desired number of replicas.
Step 4: Expose the Deployment
To access the Nginx application, you need to expose it as a service. Create a file named nginx-service.yaml:
apiVersion: v1
kind: Service
metadata:
  name: nginx-service
spec:
  type: NodePort
  selector:
    app: nginx
  ports:
    - port: 80
      targetPort: 80
      nodePort: 30001
Apply the service configuration:
kubectl apply -f nginx-service.yaml
Step 5: Access the Application
To access your Nginx application, run:
minikube service nginx-service
This command will open your default web browser to the Nginx service running on Minikube.
4. Managing Your Application with Kubernetes
Scaling the Deployment
You can easily scale your deployment by changing the number of replicas. For example, to scale to 5 replicas:
kubectl scale deployment nginx-deployment --replicas=5
Updating the Deployment
To update the Nginx image to a specific version, modify the nginx-deployment.yaml file and change the image tag. Then, apply the changes:
kubectl apply -f nginx-deployment.yaml
Deleting the Deployment
To delete the deployment and service, run:
kubectl delete deployment nginx-deployment
kubectl delete service nginx-service
I hope this blog post provides valuable insights into DevOps, Kubernetes and cost-saving benefits. If you have any questions or need further assistance, feel free to ask!
If you like this, follow us on Twitter and LinkedIn and explore our platform to help save you more cloud costs - gravitycloud.ai
Share this Article: